Category - Stairs & Handrails #
Skill Level - 2 (Intermediate) #
Estimated Time: 1-2 hours per skirt board #
Installing skirt boards is one of the most visible jobs on a staircase. It is also one of the least forgiving. A skirt board is a flat trim piece that runs along the wall next to the treads and risers. It covers the joint where the staircase meets the drywall. Get it right, and the staircase looks clean and finished. Get it wrong, and every gap shows from the bottom of the stairs. In new construction, we install skirt boards during the finish trim phase. That means after drywall, paint, and the stair treads are in place. On most jobs, the framer leaves a gap between the stair stringers (the diagonal boards under the stairs that hold up the treads and risers) and the wall. That gap lets the skirt board drop in from above. This is the drop-in method, and it is the method this guide covers. It is the most common way to install skirt boards in production homebuilding. Skirt boards do three jobs. They make the staircase look finished. They protect the wall from scuffs and foot traffic. And they hide the rough framing joints between the stairs and the drywall. Without them, you would see raw gaps, uneven cuts, and stacks of shims (thin wood wedges used to true up a fit). This is intermediate-level work. You need to be comfortable measuring angles, making compound cuts (cuts angled in two directions at once), and dry-fitting a piece (setting it in place without nailing it, just to check the fit) before you commit to a final cut. The layout and cutting take patience. Rush the measurements and you will burn material and waste time re-cutting. Follow the process step by step: measure, sketch, rough cut, dry fit, adjust, final cut, nail off. Do that, and you will get a tight, professional result every time.Before You Begin #
Before you install skirt boards, confirm the following prerequisites are complete.Prerequisites #
- Stair treads and risers are installed and secured
- Drywall is complete and painted (or at least primed)
- A gap exists between the stair stringers and the wall for the skirt to drop into (drop-in method)
- Baseboard is NOT yet installed at the top and bottom landings. The skirt board needs to go in first, so the baseboard can butt into it.
What to Know #
- Rise and run must be consistent. If the stair framer did their job, every riser height and tread depth will be uniform. Measure at least 3 rises and 3 runs to verify. If they vary by more than ⅛ inch, you’ll need to split the difference when laying out your cuts.
- Skirt boards are typically 1×12. The width needs to be tall enough to cover the stair profile with material to spare at the top and bottom. In most cases, a 1×12 (which is actually 11¼ inches) works perfectly.
- Material matters. MDF is the most common choice in production work. It is straight, paintable, and affordable. Solid wood or primed finger-joint boards also work. If you use MDF, watch the exposed edges. They need a light sanding to knock down the fuzzy fibers, or a strip of edge banding tape for a clean edge.
- The top of the skirt must be flush (level and even) with the top of the baseboard at the upper landing. This is not optional. If they do not line up, it looks wrong from every angle.
Tools Needed #
Power Tools #
- Circular saw
- Jigsaw
- Miter saw
- Orbital sander
- Air compressor with hose
- 15-gauge finish nailer
- 18-gauge brad nailer
Hand Tools #
- Framing square
- Short level (torpedo level or 2-foot level)
- Tape measure
- Pencil
- Utility knife
Supplies #
- 2-inch 15-gauge finish nails
- 1¼-inch 18-gauge brad nails
- Wood shims
- Construction adhesive (Liquid Nails or PL Premium)
- 120-grit sandpaper
Materials #
- 1×12 skirt board material (MDF, primed finger-joint, or solid wood) - length depends on staircase run, typically 10-14 feet
- Edge banding tape (if using MDF or wood veneer - for exposed cut edges)
How to Install Skirt Boards Using the Drop-In Method #
Note: These instructions cover skirt boards in new construction, where the framer left a gap between the stair stringers and the wall so the skirt can drop in from above. This is the most common method in residential production work.Step 1: Measure the Staircase and Lay Out the Skirt Profile #
Before you install skirt boards, you need to understand the staircase you are working on. Every cut on a skirt board is based on the rise and run of the stairs. Getting these measurements right is the most important part of the job.Identify Rise and Run #
- Measure at least 3 different rises (the vertical distance from the top of one tread to the top of the next tread). A typical rise in residential construction is 7½ inches, but it varies by house.
- Measure at least 3 different runs (the horizontal depth of a tread, from nose to riser). A typical run is 10 inches.
- Calculate the average of each. If your measurements are within ⅛ inch of each other, use the average. If there is more than ⅛-inch variation, you will need to adjust individual step layouts. This is uncommon in new construction, but it does happen.
Mark the Wall #
- Draw layout lines on the wall showing where the skirt board will sit. Use a pencil - these lines will be covered by the skirt.
- Mark the top of the skirt at the upper landing - this must align with the top of the baseboard that will be installed later.
- Mark the bottom termination point at the lower landing - the skirt point should sit at or above the top of the baseboard at the bottom of the stairs.
Sketch and Record All Dimensions #
- Measure any additional dimensions you’ll need for the cuts: the notch overlay at the top of the stairs (typically 1½ inches where the skirt wraps over the landing), and the termination rise at the bottom.
- Sketch the full skirt profile on a piece of scrap. This is your cut map. Include every dimension - rise, run, top notch, bottom termination, overall length. You’ll refer to this sketch through the entire process.
- Double-check every measurement before moving on. A mistake here means re-cutting the skirt board.
Step 2: Mark, Cut, and Dry Fit the Skirt Board #
The next step is to transfer your measurements onto the actual material, make your cuts, and test the fit. Expect to cut, fit, adjust, and re-cut at least once. That is normal. It is not a mistake.Transfer Measurements to the Skirt Board #
- Lay the 1×12 across your sawhorses and transfer all measurements from your sketch.
- Leave the top and bottom longer than your final cut lines - at least 2 inches extra on each end. You’ll mark the true plumb cuts during the dry fit when you can see exactly where the skirt meets the landing.
- Use your framing square (with the stair gauges set to your rise and run) to mark the stair profile along the length of the board.
Make the Rough Cuts #
- Use a circular saw for long, straight cuts along the rise and run lines.
- Use a jigsaw for the inside corners where the rise meets the run - the circular saw can’t reach into those corners. Cut just outside your line; you can fine-tune later.
- Don’t cut the top or bottom plumb lines yet (plumb means perfectly vertical, straight up and down). Those get marked during the dry fit.
Dry Fit #
- Drop the rough-cut skirt board into position between the stairs and the wall, aligning it with your pencil layout lines.
- Use shims to hold the board in position - wedge them between the back of the skirt and the wall or stringer to keep it from falling.
- Check the fit at every step. Look for gaps between the skirt profile and the stair treads and risers. Small gaps (under 1/16 inch) are within the painter's normal tolerance to seal. Larger gaps mean your rise or run measurement is off.
- Verify the top of the skirt is flush with where the baseboard will be at the upper landing.
- Mark any areas that need trimming or adjustment.
Step 3: Final Fit, Mark Plumb Cuts, and Prepare for Installation #
This is the precision step. Your rough cut should already be close. Now you make it perfect.Mark Final Plumb Lines #
- With the skirt board held in position (shimmed), use a short level to draw true plumb lines at the top and bottom termination points.
- At the top: hold a piece of scrap baseboard against the skirt to mark where the skirt profile needs to end so the baseboard will butt cleanly into it. The top of the skirt must be flush with the top of the baseboard.
- At the bottom: mark the plumb cut where the skirt terminates at the lower landing. The bottom point of the skirt should be at or above the top of the baseboard.
Make Final Cuts #
- Remove the skirt board and take it back to your sawhorses.
- Cut the plumb lines at the top and bottom using a circular saw (guided by a straight edge if needed for accuracy).
- Clean up any rough cuts from the jigsaw work with an orbital sander. Focus on edges that will be visible.
- If using MDF: Sand all cut edges with 120-grit sandpaper to smooth the fuzzy fibers. MDF edges absorb paint unevenly if not sanded.
- If using wood veneer: Apply edge banding tape to any exposed cut edges for a clean finish.
Final Dry Fit #
- Put the skirt board back in position one more time to confirm everything lines up correctly before you nail it off.
- Check: top flush with baseboard line? Bottom termination clean? Profile tight to stairs? No gaps wider than 1/16 inch?
- If everything checks out, you’re ready to install.
Step 4: Install the Skirt Board #
All the hard work is done. Once the fit is good, nailing the skirt board on is straightforward.Apply Adhesive (When Needed) #
- If there’s solid backing or studs behind the skirt board, you can nail directly without adhesive.
- If no studs or backing are present (common on the drywall side), apply a bead of construction adhesive (Liquid Nails or PL Premium) to the back of the skirt board or to the wall. This provides long-term holding strength where nails alone won’t do the job.
Position and Nail #
- Drop the skirt board into position, aligning with your pencil marks on the wall.
- Use a 15-gauge finish nailer to secure the skirt to the wall. Hit studs wherever possible - this is your primary holding power.
- Start at the top and bottom, then work along the length. This locks the end positions first and prevents the board from shifting as you nail the middle.
- Space nails 12 to 16 inches apart. Closer spacing near the top and bottom where the skirt transitions to the landing.
- If the skirt board pulls away from the wall between studs, use shims behind it to push it tight, then nail through the shim.
Nailing Tips #
- Don’t overdrive nails into MDF - it will blow out the surface and leave a crater instead of a small hole. Adjust your compressor pressure down if needed.
- Nail into the flat face of the skirt, not near edges where the material can split.
- Where the skirt meets the stair treads, use an 18-gauge brad nailer instead. The thinner nail tacks the profile edge tight without the risk of the heavier nail shifting the board.
Set, Clean, and Sweep #
- Set any proud nails (nail heads sticking up above the surface): Run a hand down the face of the skirt board. If a nail head sits even a little proud, it will show through the paint. Set it below the surface with a nail set.
- Clean any adhesive squeeze-out: Wipe excess construction adhesive off the wall or the back of the skirt while it is still wet, before it skins over and has to be scraped.
- Check the fit one more time: Top flush with the baseboard line, bottom termination clean, profile tight to the treads and risers.
- Sweep up: Cutoffs collected, dust and shavings off the treads and floor.
Filling the nail holes and sealing the gap where the skirt meets the wall or stairs is the painter's job, not ours. He fills and coats the whole staircase in one pass, using one set of materials. If we fill or seal ahead of him, that spot looks different once he applies the finish coat, and he ends up redoing it anyway. What he needs from us is simple: a tight profile, a flush top, fasteners set below the surface, and a swept run.
Quality Check After You Install Skirt Boards #
Your skirt board installation is complete when all of the following are true:- ✓ Skirt board is tight to the wall with no visible gaps
- ✓ Top of skirt is flush with the top of the baseboard at the upper landing
- ✓ Bottom skirt point sits at or above the top of the baseboard at the lower landing
- ✓ Stair profile (rise/run cuts) is tight to treads and risers - no gaps wider than 1/16 inch
- ✓ The stair-step notches are even and consistently spaced along the full length of the skirt
- ✓ Every nail is set below the surface, nothing proud to the touch
- ✓ No splits, cracks, or surface damage from nailing
- ✓ Cut edges are smooth, no fuzzy or sharp MDF fibers left
Troubleshooting #
Even careful work runs into problems sometimes. Here are the most common ones and how to fix them. Problem: The skirt board has a gap between the stair profile and the treads and risers. Solution: A gap under 1/16 inch is within the painter's normal tolerance to close. A gap wider than that means your rise or run measurement was off. Re-measure, re-mark, and re-cut the profile rather than leaving it. A gap that size will not close on its own. Problem: The skirt board does not sit flat against the wall. It bows or rocks. Solution: The wall surface may not be flat. This is common with drywall over uneven framing. Use shims behind the skirt at the low spots to bring it tight, then nail through the shims. Construction adhesive on the back of the skirt also helps bridge small irregularities. Problem: The top of the skirt does not line up with the baseboard height at the upper landing. Solution: This is usually a layout error from Step 1. You may need to adjust the overall height of the skirt by trimming the bottom edge. Before doing this, hold a piece of baseboard at the top landing and check where the alignment breaks. Sometimes the baseboard can be adjusted instead. Problem: The MDF is swelling or fuzzing up on the cut edges. Solution: Sand with 120-grit and seal the edge with a coat of wood glue thinned with water (50/50 mix). This hardens the fuzzy fibers so the edge stops swelling, and it gives the painter a clean surface to coat. Never leave raw MDF edges unsanded. Problem: Nails are blowing through the surface of the skirt board (MDF). Solution: Turn down the air pressure on your compressor. MDF is softer than solid wood and needs less pressure. The nail should set just below the surface, not blow through it. Test on a scrap piece first. Problem: The skirt board cracks when you nail near the edge. Solution: Keep nails at least ¾ inch from any edge. If you need to nail closer, near the stair profile edge, switch to an 18-gauge brad nailer. The thinner nail is less likely to split the material.Related Guides #
Working on a staircase? After you install skirt boards, these guides cover the other finish carpentry tasks you’ll encounter. For additional reference on staircase trim techniques, see this This Old House guide on stair skirt boards.- How to Install Baseboard - The baseboard at each landing butts into the skirt board. Install skirts first, then baseboard.
- How to Install a Wall-Mount Handrail - Handrails go up after skirt boards are in place.
- How to Install Metal Balusters - For open staircases with balusters instead of a wall on one side.
- How to Install Newel Posts - Newel posts anchor the handrail system at the top and bottom of the staircase.
Reference Photos #
The following photos show examples of this type of work completed in the field. These serve as visual references for quality standards, proper installation techniques, and finished results.
Showing 25 of 25 photos
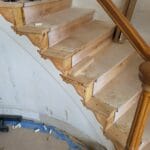
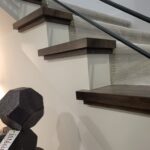
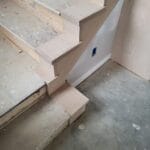
Skirt boards, notched
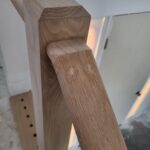
This photo shows a detailed view of a finished skirt board installation at the base of a newel post, highlighting craftsmanship and joinery.
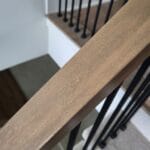
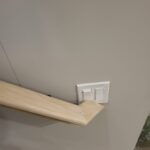
Close-up of a wooden handrail with iron balusters, showcasing the craftsmanship and finish details during the installation process.
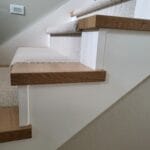
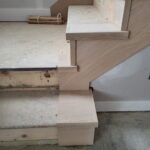
This photo shows the installation of skirt boards during the carpentry process, highlighting the alignment and fit with the surrounding elements.
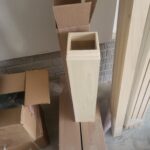
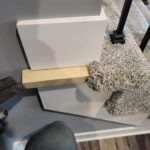
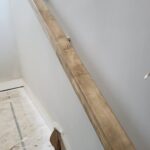
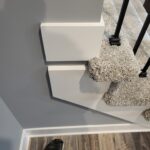
This photo shows a partially assembled skirt board, indicating work in progress for trim installation.
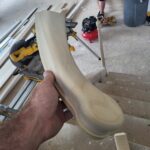
A worker is holding a piece of wood nosing, which is being prepared for installation on the stairs. The photo captures the ongoing work process.
Close-up of a wooden handrail joint showing craftsmanship and joinery details during the installation process.
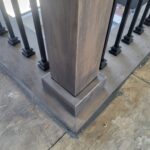
This photo shows a finished wood wall cap installed on a staircase, highlighting the clean lines and craftsmanship of the trim work.
This photo shows a close-up of finished wood nosing on stairs, highlighting the clean edges and craftsmanship of the installation.

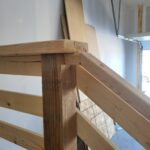
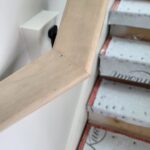
Close-up of a wood wall cap installation showing the joinery and mounting details. The wood is unfinished and highlights craftsmanship.
Close-up of a finished wood nosing detail on a staircase, showcasing the craftsmanship and smooth edges before final finishing.
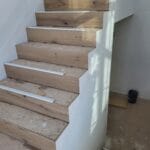
This photo shows the installation of skirt boards along a staircase, highlighting the raw wood before finishing. The work is currently in progress.
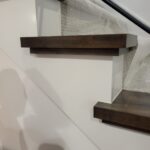
This photo shows a finished staircase with wood nosing installed on the edges, providing a clean and polished look to the steps.

This photo shows a finished wood wall cap installed along a wall, highlighting the craftsmanship and detail of the joinery.
This photo shows a finished wood wall cap installed at the top of a wall, highlighting the craftsmanship and detail of the trim work.
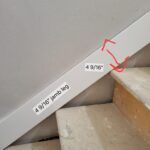
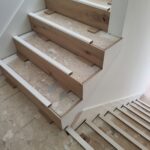
This photo shows the installation of skirt boards along the staircase, highlighting the precise measurements and alignment during the work process.
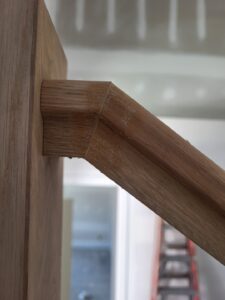
Close-up of a wooden handrail showing the joinery detail and finish quality. This image highlights craftsmanship in stair construction.
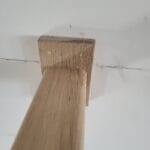
Close-up of a wood wall cap installation, showcasing the joinery and finish details at the top of a wall.
Close-up of a finished wood nosing detail on a staircase, showcasing craftsmanship and joinery.
This photo shows a completed trim installation of skirt boards at the base of a staircase, highlighting the clean lines and craftsmanship.

Skirt boards, notched
Skirt boards
Wood wall cap
Wood Nosing, linear ft
Wood Nosing, linear ft
×
‹
›
![]()


