Doors #
Skill Level: Level 2 (Intermediate) #
Estimated Time: 1-2 Hours Per Door #
Introduction #
Installing an exterior finish slab is one of the most satisfying finish carpentry tasks. Every exterior door frame in new construction gets a temporary “bang door” — a cheap, sacrificial slab that protects the jamb and weatherstripping while framers, drywallers, and painters do their work. The bang door takes the abuse so the finish slab doesn’t have to. Your job is to remove that beat-up protector and install the permanent exterior finish slab that the homeowner will use for decades.
This is one of the most visible tasks in finish carpentry. An exterior door is the first thing people touch when they enter a home. If the reveal is uneven, the weatherstripping doesn’t seal, or the latch doesn’t engage cleanly, it’s immediately obvious. Unlike interior work where minor imperfections can hide, exterior doors are held to a higher standard because they also serve as the building envelope — keeping water, air, and insects out.
In production new construction, exteriors are typically pre-hung units set by framers. By the time you arrive for finish work, the jamb is already installed, shimmed, and (hopefully) plumb. Your scope starts with pulling the bang door and ends with a perfectly operating finish slab with verified weatherstripping seal. If the jamb has issues — out of plumb, racked, or damaged — you’ll need to address those before the slab goes on.
This guide walks you through the complete process from bang door removal to final quality checks. Follow each step carefully and you’ll produce a door that swings smoothly, latches positively, and seals tight against the elements.
📷 Photo Needed
Completed exterior finish slab installation — properly hung and sealed finish door — finished result showing professional quality
Before You Begin #
Prerequisites #
- The exterior door frame must be fully installed, shimmed, and secured to the rough opening
- All framing, insulation, and drywall work around the door opening must be complete
- Exterior casing or brick mold should already be installed (or planned for after slab install)
- Confirm the correct finish slab has been delivered — match model number, swing direction, and size to the spec sheet
- Previous experience removing and hanging doors, or supervision by a lead carpenter
What to Know #
- Exterior slabs are significantly heavier than interior doors — fiberglass and steel slabs can weigh 60-90 lbs. Have a helper available for heavy units.
- Hinge mortises on quality exterior frames are typically pre-cut at the factory. Verify they match the slab before starting.
- Exterior hinges are usually 4″ x 4″ ball-bearing hinges, not the 3.5″ residential hinges used on interior doors.
- The reveal (gap between slab and jamb) should be approximately 1/8″ on all three sides — top and both sides. This is tighter than interior doors because weatherstripping must compress to seal.
- Never force a slab that doesn’t fit. If you have to muscle it in, something is wrong with the jamb or the slab was ordered incorrectly.
Tools Needed #
Power Tools #
- Cordless drill/driver — for hinge screws and strike plate
- Cordless impact driver — for long structural screws if needed
- Oscillating multi-tool — for trimming shims or minor jamb adjustments
Hand Tools #
- 6-foot level — essential for checking jamb plumb and slab alignment
- 4-foot level — for checking head jamb level
- Torpedo level — for checking hinge plumb during hanging
- Sharp chisel set (3/4″ and 1″) — for adjusting hinge mortises if needed
- Utility knife — for scoring, trimming weatherstripping, general use
- Nail puller / flat bar — for removing bang door hinge pins
- Hammer — for tapping hinge pins and general use
- Phillips and flat head screwdrivers — for hinge screws
- Tape measure — 25 ft minimum
- Pencil
📷 Photo Needed
Tools and materials laid out for installing an exterior finish slab — everything needed before starting
Supplies #
- Hinge screws — matching the existing hinge pattern (typically #9 x 1″ for slab leaves, #9 x 3″ for at least one screw per hinge into framing)
- Spray foam insulation (low-expansion door/window formula) — for sealing gaps between jamb and framing
- Shims — cedar or composite, for minor jamb adjustments
- Painter’s tape — for protecting finish surfaces during work
📷 Photo Needed
Supplies — photo illustrating this section
Materials #
- Exterior finish slab — specified by the builder (fiberglass, steel, or wood) with factory-applied finish or primed for field painting
- Hinges — typically 4″ x 4″ ball-bearing exterior hinges, satin nickel or oil-rubbed bronze to match hardware spec (usually 3 hinges per door)
- Weatherstripping — verify existing is intact; replacement compression or magnetic strip if damaged
📷 Photo Needed
Tools and materials laid out for installing an exterior finish slab — everything needed before starting
Exterior Finish Slab Installation Process #
Step 1: Remove the Bang Door #
The bang door comes off before anything else. It’s been protecting the jamb throughout rough construction and it’s taken a beating — expect dents, paint splatter, and possibly damaged hinges.
Sub-Steps #
- Open the door to approximately 90 degrees and support the weight by placing a shim or block under the latch side
- Start with the bottom hinge — drive the hinge pin up and out using a nail set and hammer from below. Tap the pin upward from the bottom of the hinge barrel.
- Move to the middle hinge (if present) and remove that pin next
- Remove the top hinge pin last while supporting the slab weight. The door will want to fall once the top pin is out — keep your hand on it.
- Lift the slab off the hinge leaves and set it aside out of the work area
- Remove the bang door’s hinge leaves from the jamb if they won’t be reused (most bang doors use cheaper hinges)
Pro Tip: Always remove hinge pins bottom-to-top. If you pull the top pin first, the full weight of the door pivots on the bottom hinge and can tear out the screws or damage the jamb. Bottom-first keeps the weight supported by the remaining upper hinges.
📷 Photo Needed
Remove the Bang Door — showing the key action and what the result should look like
Step 2: Inspect and Prepare the Door Jamb #
With the bang door removed, you have full access to inspect the jamb. This is your chance to catch problems before the finish slab goes on. It’s much easier to fix jamb issues now than after the door is hung.
Sub-Steps #
- Clean all construction debris from the jamb — scrape off drywall mud, paint drips, and dirt with a putty knife
- Inspect the hinge mortises on the jamb for damage. Look for stripped screw holes, torn-out wood, or mortises that have been gouged deeper than factory spec.
- Check the hinge side jamb for plumb using your 6-foot level. Place the level against the full length of the hinge jamb. It should read plumb (bubble centered). Deviation of more than 1/16″ over the door height needs correction.
- Check the head jamb for level. Use your 4-foot level across the top. It should be level or very slightly higher on the hinge side (1/32″ max).
- Measure the jamb opening at three points: top, middle, and bottom for width; hinge side, center, and latch side for height. All measurements should be consistent within 1/16″.
- Check for square by measuring diagonals corner-to-corner. They should match within 1/8″.
- Inspect weatherstripping on all three sides — it should be intact, pliable, and firmly seated in its groove. Replace any sections that are torn, compressed flat, or missing.
- Verify the threshold is secure and level. Tighten adjustment screws if the threshold has them.
Pro Tip: If screw holes in the hinge mortises are stripped from the bang door, plug them now. Break a wooden golf tee off in the hole with wood glue, or drive a hardwood dowel in with glue. Let it set before driving new screws. This gives the finish slab hinge screws solid wood to bite into.
📷 Photo Needed
Inspect and Prepare the Door Jamb — showing the key action and what the result should look like
Step 3: Prepare the Finish Slab #
Before hanging, the finish slab needs to be inspected and fitted with hardware. Take your time here — a damaged slab or misaligned hinge will cost you more time later.
Sub-Steps #
- Unwrap the finish slab and inspect it for shipping damage — dents, scratches, warping, or finish defects. Report any damage before installation.
- Verify the slab dimensions match the jamb opening. The slab should be sized to leave approximately 1/8″ reveal on the top and both sides.
- Confirm the swing direction — stand outside looking in. A right-hand door has hinges on the right; left-hand has hinges on the left.
- Install the hinge leaves onto the slab using the pre-cut mortises. Most quality exterior slabs have factory-routed hinge mortises. Seat each hinge leaf flush with the slab edge.
- Drive screws snug but don’t overtighten — you may need to adjust. Use the provided hinge screws (typically #9 x 1″ flat head).
- If the mortise depth doesn’t match (hinge leaf sits proud or recessed), adjust with a sharp chisel. The hinge leaf must sit perfectly flush with the slab edge.
Pro Tip: Before driving screws into pre-drilled holes, run a self-centering bit (Vix bit) through each hole first. This ensures the screw centers perfectly in the hinge countersink and prevents the hinge from shifting when you tighten down.
📷 Photo Needed
Prepare the Finish Slab — showing the key action and what the result should look like
Step 4: Hang the Finish Slab #
This is the critical step. The slab needs to be lifted into position and pinned starting from the top. On heavy exterior doors, a second person makes this dramatically easier and safer.
Sub-Steps #
- Position the slab in the opening, tilting it slightly toward the hinge side. Support the bottom on a shim to hold it at the correct height.
- Align the top hinge first. This is the opposite of removal — you hang from the top down. Line up the slab hinge leaf with the jamb hinge leaf (or hinge mortise) and drive the top hinge pin down through the barrel.
- With the top hinge holding the slab, swing it to align the middle hinge and install that pin
- Finally, align and pin the bottom hinge
- Tap all hinge pins fully seated using a hammer and nail set. Don’t mushroom the pin tops.
- If using separate jamb-side hinge leaves (not a continuous knuckle), install the jamb leaf screws now. Use at least one 3″ screw per hinge that reaches through the jamb and shims into the framing stud.
Pro Tip: Always hang top hinge first. The top hinge carries the majority of the door’s weight. Starting there means you’re fighting gravity less as you align the lower hinges. If you start at the bottom, the unsupported top of the door will swing and make alignment nearly impossible.
📷 Photo Needed
Hang the Finish Slab — showing the key action and what the result should look like
Step 5: Test Operation and Adjust #
With the slab hung, you need to verify it operates correctly. A door that looks good but doesn’t function properly isn’t finished.
Sub-Steps #
- Slowly swing the door through its full range of motion — from fully open to fully closed. It should move smoothly without rubbing, sticking, or springing.
- Check the reveal (gap) on all three sides. Use a 1/8″ drill bit as a gauge — it should slide into the gap with light resistance on all sides. The reveal should be consistent from top to bottom on both sides and across the head.
- If the reveal is uneven, adjust by shimming behind the hinge that needs to move. Shimming the top hinge moves the top of the door away from the hinge jamb; shimming the bottom hinge does the same at the bottom.
- Test the latch engagement. Close the door and verify the latch bolt engages the strike plate cleanly. The bolt should retract and extend without force.
- Check for self-closing or self-opening. The door should stay at any position you leave it — if it swings on its own, the jamb isn’t plumb. Correct by adjusting hinge shims.
- Close the door and check for daylight around the weatherstripping. Look from inside with exterior light — you should see zero daylight gaps. The weatherstripping should compress evenly all the way around.
Pro Tip: The nickel test: a standard US nickel is almost exactly 1/8″ thick. Slide it around the reveal to quickly check consistency. If it binds or falls through, the reveal needs adjustment at that spot.
📷 Photo Needed
Test Operation and Adjust — showing the key action and what the result should look like
Step 6: Seal and Insulate #
The final step ensures the door assembly is properly sealed against air infiltration and moisture. This step is critical for energy efficiency and building code compliance.
Sub-Steps #
- Apply low-expansion spray foam in the gap between the jamb and the rough opening framing. Use ONLY door/window formula foam — standard expanding foam will bow the jamb and ruin your careful alignment.
- Apply foam in short bursts, filling no more than 1/3 of the gap depth. It will expand to fill the rest. Overfilling will push the jamb inward.
- Pay special attention to the area behind the strike plate — this is a common air leak point
- Inspect the threshold seal. Close the door and check that the door bottom contacts the threshold weather seal evenly across its full width. Adjust threshold height screws if available.
- Wait for the foam to cure (typically 1 hour) before trimming excess with a utility knife
- Re-test the door operation after foam cures. If the foam bowed the jamb, you may need to score and break it out, then reapply more conservatively.
Pro Tip: Keep a spray bottle of water handy. Mist the rough opening surfaces before applying foam — moisture accelerates foam curing and improves adhesion. Don’t soak it, just a light mist.
📷 Photo Needed
Seal and Insulate — showing the key action and what the result should look like
📷 Photo Needed
Process — photo illustrating this section
Quality Check Criteria #
Before you walk away from this door, verify every item on this list. Exterior doors are the frontline of the building envelope — every detail matters.
- ✓ Reveal is approximately 1/8″ and consistent on all three sides (top, hinge side, latch side)
- ✓ Door swings smoothly through full travel with no rubbing, sticking, or binding
- ✓ Door does not self-close or self-open (stays at any position)
- ✓ Latch bolt engages strike plate cleanly without force
- ✓ Zero daylight visible around weatherstripping when door is closed (viewed from inside)
- ✓ All hinge screws are tight and at least one screw per hinge penetrates into framing
- ✓ Threshold seal contacts door bottom evenly across full width
- ✓ Spray foam applied between jamb and framing; no visible gaps from interior side
📷 Photo Needed
Completed install an exterior finish slab — close-up detail shots showing quality criteria being met
Troubleshooting #
Problem: Door rubs on the latch side near the top when closing.
Solution: The top hinge is likely recessed too deep or the hinge-side jamb is slightly out of plumb. Add a thin cardboard shim behind the top hinge leaf on the jamb side to push the top of the door toward the hinge jamb. If the jamb is significantly out of plumb, you may need to re-shim behind the jamb at the top hinge location.
Problem: Latch bolt doesn’t align with the strike plate.
Solution: First, check if the misalignment is vertical or horizontal. If the bolt hits above or below the strike plate opening, you need to adjust the door height by shimming hinges. If the bolt doesn’t extend far enough to reach the plate, the door may be too far from the latch jamb — check your reveal and adjust hinge depth. As a last resort, elongate the strike plate opening with a file, but this is a band-aid, not a fix.
Problem: Daylight visible at the bottom of the door.
Solution: Adjust the threshold height using the adjustment screws (most modern thresholds have them). Turn the screws clockwise to raise the threshold until the weatherstripping on the door bottom contacts evenly. If the threshold doesn’t have adjustment screws, you may need to remove and re-set it on a bead of caulk to raise it.
Problem: Door swings shut or open on its own.
Solution: The hinge-side jamb is not plumb. A jamb that leans into the room causes the door to swing closed; a jamb that leans outward causes it to swing open. Re-check plumb with your 6-foot level and adjust shims behind the jamb as needed. Even 1/16″ out of plumb over the door height is enough to cause self-swing.
Problem: Hinge screws won’t tighten — they spin freely in the hole.
Solution: The screw holes are stripped, likely from the bang door taking abuse. Remove the hinge, glue wooden toothpicks or a hardwood dowel into the stripped hole, let the glue set for 30 minutes, then re-drill a pilot hole and drive the screw. For critical structural screws, use the next size larger gauge screw.
Problem: Spray foam bowed the jamb inward, causing the door to stick.
Solution: Use a utility knife or oscillating tool to cut out the foam behind the affected area. Scrape back to the original shim position. Re-apply foam in thinner beads — never fill more than 1/3 of the gap depth. If the bow is severe, you may need to remove the casing, break out all foam, re-shim, and re-foam.
📷 Photo Needed
Common issues and fixes — showing examples of problems like: Problem:, Problem:, Problem:
Related Guides #
- How To Install an Exterior Door — Full pre-hung exterior door installation from rough opening
- How To Install Exterior Door Casing — Finishing the exterior trim around the door frame
- How To Adjust an Exterior Door Slab — Fine-tuning an installed exterior slab for perfect operation
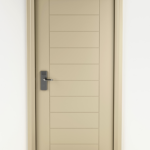
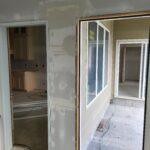
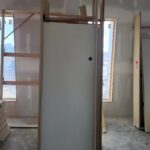
Reference Photos #
The following photos show examples of this type of work completed in the field. These serve as visual references for quality standards, proper installation techniques, and finished results.
Showing 3 of 3 photos