Doors #
Skill Level: Beginner (Level 1) #
Estimated Time: 45-90 Minutes #
Introduction #
Learning how to install bifold doors is one of the most useful skills in residential trim carpentry. Bifold doors are the most common closet door type in residential construction. They consist of two panels (or four for wider openings) hinged together that fold accordion-style when opened. When closed, they look like a standard pair of doors. When opened, each pair of panels folds flat against the side of the opening, giving you access to the full width of the closet without a door swinging into the room or requiring wall space for a pocket.
The door pivots on pins at the top and bottom of the jamb side, and rides in a track at the top on the non-pivot side via a roller guide. Adjustments are made through spring-loaded pivot pins and track-mounted guides. The hardware is simple and inexpensive, and once you understand the mechanics — a fixed pivot on one side and a sliding guide on the other — the installation is straightforward and repeatable from closet to closet throughout a house.
Bifold doors come in single bifold (two-panel, one track) and double bifold (four-panel, two tracks meeting at center) configurations. Whether you install bifold doors in a single or double configuration, the installation principles are the same. A single bifold covers openings up to about 3 feet wide, and double bifolds handle openings from 4 to 6 feet. The process is identical for each side of a double bifold; you simply repeat the steps for the second pair of panels.
📷 Photo Needed
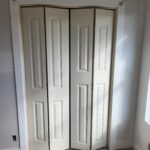
Completed install bifold doors — finished result showing professional quality
Before You Begin #
Prerequisites #
Before you install bifold doors, make sure the following prerequisites are in place.
- The rough opening has been framed and cased — the head jamb and side jambs are installed, plumb, level, and square
- Floor covering is complete (carpet, tile, hardwood, or LVP) — this establishes the finished floor height for setting the bottom pivot pin clearance
- The opening width and height have been measured and match the bifold door size being installed
What You Need To Know #
When you install bifold doors, understanding the hardware system ahead of time will save you frustration and callbacks.
- The track mounts to the underside of the head jamb. It carries the roller guide that supports the non-pivot side of the door as it opens and closes.
- The bottom pivot bracket mounts to the floor or the door jamb at the pivot side. It holds the bottom pivot pin and anchors the door at the hinge side.
- Doors typically need to be trimmed to fit the opening height. Standard clearance is 3/4″ to 1″ gap at the bottom between the door and the finished floor. Measure carefully before cutting.
- Pre-drilled holes for pivot pins and roller guides are usually pre-installed in the door panels by the manufacturer. Verify these exist before you start — if not, you will need to drill them using the hardware kit template.
- The spring-loaded top pivot pin is the key to hanging the door. It pushes up into a socket in the track, allowing you to tilt the bottom into the floor bracket. Understanding this mechanism before you start will save time and frustration.
Tools Required #
Power Tools #
- Drill/driver
- Circular saw (for trimming door height if needed)
Hand Tools #
- Tape measure
- Pencil
- Screwdriver (flathead and Phillips)
- Level
- Hacksaw (for cutting track to length if needed)
Supplies #
- Bifold door hardware kit — includes track, pivot brackets, roller guides, pivot pins, and aligners (usually packaged with the doors)
- Screws (provided in hardware kit or matching size)
Materials #
- Bifold door panels (two panels for single bifold, four panels for double bifold)
- Door knobs or pulls
📷 Photo Needed
Tools and materials laid out for installing bifold doors — everything needed before starting
How to Install Bifold Doors #
Step 1: Measure and Prep #
The first step when you install bifold doors is accurate measurement. Measure the opening width at the top (at the head jamb) and at the bottom (at the floor). Measure the height on both sides. If the opening is not square, the doors will need to be trimmed to the smallest dimension minus the required clearance. Check the opening for plumb and level — bifold doors are less forgiving of out-of-square openings than hinged doors because the track must be level for the roller guide to operate smoothly.
If the doors need to be trimmed for height, measure the finished opening height and subtract 3/4″ to 1″ for bottom clearance. This gap allows the door to swing open over carpet or flooring without dragging. When trimming, remove equal amounts from each panel to maintain proportions and keep the hinge joint centered. Use a straightedge clamped to the door as a guide for your circular saw to ensure a clean, straight cut.
📷 Photo Needed
Measure and Prep — showing the key action and what the result should look like
Step 2: Install the Track #
To install bifold doors properly, the track must fit the opening precisely. Cut the track to fit the opening width if needed — most tracks come slightly long and need to be trimmed with a hacksaw. File any burrs from the cut end so the roller guide slides smoothly. Position the track centered on the underside of the head jamb with equal setback from the front and back edges. Secure the track with the provided screws, driving them into the head jamb framing for solid hold.
For a single bifold, position the roller guide slider in the track on the non-pivot side. For a double bifold, position one roller guide slider on each side of center. Make sure the sliders move freely in the track before proceeding.
Pro Tip: If you have a double bifold (4 panels), the track will have a center snugger/stop. Make sure this is centered in the opening before tightening. This stop prevents the two door pairs from overlapping at the center and holds them in alignment when closed.
📷 Photo Needed
Install the Track — showing the key action and what the result should look like
Step 3: Install Bottom Pivot Bracket #
When you install bifold doors, the bottom pivot bracket anchors the entire door assembly. Mount the bottom pivot bracket on the floor at the pivot side of the opening. The bracket holds the bottom pivot pin and anchors the door at the jamb. Position it so the door will be centered in the opening when closed — typically 3/8″ from the edge of the door jamb. Some brackets mount to the floor surface, while others mount to the face of the side jamb near the floor. Use the style that matches your hardware kit.
Secure the bracket with the provided screws. If mounting to the floor over tile or hardwood, pre-drill to avoid cracking. The bracket must be firmly anchored — it carries the weight of the pivot side of the door and will loosen quickly if the screws don’t bite into solid material. For carpet installations, push the bracket down through the carpet pile to the subfloor beneath.
📷 Photo Needed
Install Bottom Pivot Bracket — showing the key action and what the result should look like
Step 4: Install Pivot Pins and Roller Guide on Doors #
Insert the spring-loaded top pivot pin into the pre-drilled hole at the top corner of the jamb-side panel. This pin has a spring mechanism that allows you to push it up (compressing the spring) to clear the track socket during installation, then release it to lock into place. Insert the bottom pivot pin into the pre-drilled hole at the bottom corner of the same panel — this pin is typically a fixed pin or has a small height adjustment.
Install the roller guide pin at the top corner of the track-side panel (the panel opposite the pivot side). This pin rides in the overhead track and supports the non-pivot side of the door as it opens and closes. If the two panels are not pre-hinged, connect them now using the hinges provided — typically two or three hinges along the meeting edges of the panels.
Pro Tip: The spring-loaded pivot pin pushes UP into the track hole. Push it up, tilt the bottom into the floor bracket, then release the spring pin into the track socket. Practice the motion before committing — it’s awkward the first time. Having a helper hold the door steady while you engage the pins makes this much easier.
📷 Photo Needed
Install Pivot Pins and Roller Guide on Doors — showing the key action and what the result should look like
Step 5: Hang the Door #
This is the step where you actually install bifold doors into the opening. Tilt the door assembly into the opening at a slight angle. Set the bottom pivot pin into the hole in the floor bracket first. Then push the spring-loaded top pivot pin upward (compressing the spring) and align it with the pivot socket at the end of the track. Release the spring pin so it seats into the socket. The door should now be supported at the top and bottom on the pivot side.
Slide the roller guide pin on the opposite panel into the track slider. The roller guide should move freely along the track as you open and close the door. Test the operation by folding and unfolding the door several times. It should move smoothly without binding, jumping, or dragging. If the door feels stiff or catches, check that the roller guide is properly seated in the track and that the pivot pins are fully engaged.
📷 Photo Needed
Hang the Door — showing the key action and what the result should look like
Step 6: Adjust and Install Hardware #
After you install bifold doors, fine-tuning is essential for smooth operation. Use the adjustment screw on the bottom pivot bracket to raise or lower the pivot side of the door. This controls the door’s plumb and the gap at the bottom. Turn the screw clockwise to raise the door and counterclockwise to lower it. Check the door with a level and adjust until it hangs plumb when closed. The gap at the bottom should be consistent across the full width of the door.
Adjust the roller guide position in the track to control the spacing between the door and the side jamb on the non-pivot side. The guide typically has a small set screw that allows you to slide it along the track and lock it in position. Set it so the door is centered in the opening when closed, with equal gaps on both sides.
Install door pulls or knobs on the leading panel (the panel closest to the center of the opening). Position the hardware at a comfortable height — typically 36″ from the floor, centered on the panel width. Install door aligners at the top of the opening if provided with your hardware kit. These small clips or magnets keep the panels aligned and flush when the door is in the closed position.
📷 Photo Needed
Adjust and Install Hardware — showing the key action and what the result should look like
📷 Photo Needed
How to Install Bifold Doors — photo illustrating this section
Quality Check After You Install Bifold Doors #
- Door folds and unfolds smoothly without binding or catching
- Door hangs plumb when closed
- Even gap at top and bottom
- Panels align flush when closed
- Knobs or pulls installed and functional
- Door does not jump off track during operation
- Bottom clearance is consistent across the full width of the door
📷 Photo Needed
Completed install bifold doors — close-up detail shots showing quality criteria being met
Troubleshooting #
Door Jumps Off Track #
This is the most common callback after you install bifold doors. If the door pops out of the track during operation, the roller guide is likely worn or the track is misaligned. Inspect the roller guide pin — if it is bent or the roller is cracked, replace it with a new one from the hardware kit. Check that the track is securely fastened and level. If the track has shifted, re-secure it to the head jamb. Also verify the roller guide slider is the correct size for the track — mismatched hardware from different manufacturers can cause fitment issues.
Door Doesn’t Close Flush #
If the door doesn’t sit flush in the opening when closed, adjust the bottom pivot bracket. The bracket can be moved in or out (toward or away from the jamb) to change the door’s closed position. Loosen the bracket screws slightly, reposition, and re-tighten. Small adjustments make a big difference — move it 1/16″ at a time and test after each adjustment until the door sits flat and centered in the opening.
Door Drags on Carpet or Floor #
Raise the bottom pivot pin using the height adjustment screw on the pivot bracket. This lifts the entire door to increase the bottom clearance. If the adjustment range is maxed out and the door still drags, you may need to trim the bottom of the door panels. Remove the door, mark the cut line evenly across both panels, and trim with a circular saw using a straightedge guide. Reinstall and verify clearance.
Panels Don’t Align When Closed #
Misaligned panels are corrected by installing or adjusting the top aligner or snugger. This small hardware piece mounts at the top of the opening and applies gentle pressure to hold the panels in alignment when the door is closed. If an aligner is already installed, adjust its position — moving it closer to or farther from the center of the opening changes how the panels meet. Make sure the hinge between the panels is not loose, as worn hinge screws can also cause misalignment.
Door Binds When Folding #
If the door resists folding or feels stiff at the hinge point, check the hinge screws — they may be overtightened, preventing the panels from pivoting freely. Back the screws out a quarter turn and test. If the panels themselves are warped (common with hollow-core doors stored improperly), the warp creates friction at the hinge joint. Minor warping can sometimes be corrected by adjusting the pivot bracket and track position. Severely warped panels should be replaced — no amount of hardware adjustment will fix a twisted door.
Related Guides #
For additional detail on bifold door hardware mechanisms, see this guide from Family Handyman on bifold door repair and adjustment.
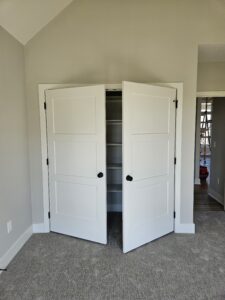
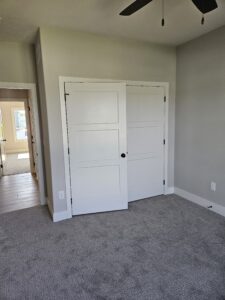
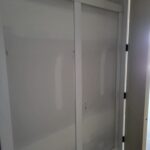
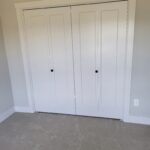
Reference Photos #
The following photos show examples of this type of work completed in the field. These serve as visual references for quality standards, proper installation techniques, and finished results.
Showing 5 of 5 photos