
General Carpentry #
Skill Level: Expert (Level 3) #
Estimated Time: 4-8 Hours #
Introduction #
A shiplap fireplace is one of the most popular feature walls in modern residential design. A 3-sided fireplace — also called a peninsula or three-sided fireplace — adds complexity because the shiplap must wrap around outside corners on both sides. Unlike a flat accent wall where you simply stack boards from bottom to top, a peninsula fireplace requires you to manage three planes simultaneously, keeping every course level and aligned across all faces.
Additionally, the main challenge is the outside corners — where the front face meets each side return. You have three options: mitered corners (most seamless, hardest to execute), butt joints with one side overlapping the other, or decorative corner trim (easiest, covers the joint entirely). This guide focuses on mitered corners for a professional, seamless finish that eliminates visible end grain and makes the shiplap fireplace appear seamless from every angle.
Furthermore, heat clearance is critical for any shiplap fireplace project. Check the manufacturer’s specifications for minimum clearance to combustibles before you begin layout. The mantel and immediate surround area typically require non-combustible materials or specific clearance distances. Shiplap is a combustible material and must stay outside the required clearance zone. Ignoring this requirement creates a fire hazard and violates building codes — no amount of good-looking woodwork is worth that risk.
Moreover, planning your layout before cutting is essential. The board spacing should look intentional — widths consistent, reveals uniform, and the top and bottom rows should be equal (or at least not awkwardly thin). This means doing the math BEFORE you start nailing. Measure the total height, divide by the board exposure, and adjust your starting point so you end up with balanced rows at both the top and bottom of each face.
📷 Photo Needed
Completed install shiplap on a 3-sided fireplace — finished result showing professional quality
Before You Begin #
Prerequisites #
- Fireplace installed and operational
- Framing and substrate complete on all three sides (typically 1/2″ plywood or drywall)
- Mantel location determined (if applicable)
- Paint or stain color decided — easier to finish boards before installation
What You Need To Know #
- Shiplap boards overlap each other by the “lap” (ship-lap joint) — typically 1/4″ to 3/8″
- True board width is the visible face PLUS the hidden lap
- Plan layout so that board joints on the front face don’t align with joints on the side returns — stagger for visual appeal
- PRE-FINISH boards before installation when possible — you can’t easily paint or stain between boards after they’re up
- Use nickel spacing for consistent reveals between boards
Tools Required #
Power Tools:
- Miter saw (with fine-tooth blade for clean cuts)
- 18-gauge brad nailer
- Table saw (for ripping)
- Orbital sander
Hand Tools:
- Tape measure
- Pencil
- Level
- Speed square
- Torpedo level
- Small block plane
- Utility knife
- Caulk gun
Supplies #
- 18-gauge brad nails (2″)
- Construction adhesive (for problem areas)
- Wood filler
- Painter’s caulk
- Nickel coins or 1/8″ spacers (for consistent reveals)
- 120-grit sandpaper
- Primer/paint or stain (finish boards before install)
Materials #
- Shiplap boards (tongue-and-groove or rabbeted)
- Corner trim (if not mitering)
- Mantel (if applicable)
📷 Photo Needed
Tools and materials laid out for installing shiplap on a 3-sided fireplace — everything needed before starting
Shiplap Fireplace Installation Process #
Step 1: Plan the Layout #
However, measure the total height of each face of the fireplace surround. Divide the height by the shiplap board exposure (the visible face width — the full board width minus the lap). This tells you how many courses you need. If the math doesn’t work out to full boards, adjust your starting point so that any partial-width rips end up at the top or bottom — ideally split evenly between the two so both look intentional. Mark a level line for the first board on all three faces.
Consequently, the goal is to have full or near-full boards everywhere. A 1″ sliver at the top looks like a mistake. A 3″ board at top and bottom looks like a design choice. Take the time to plan this on paper before you pick up a nail gun.
Pro Tip: Start your layout planning at the most visible point — usually the center of the front face. If you have to have a narrow rip, put it at the bottom where furniture may hide it.
📷 Photo Needed
Plan the Layout — showing the key action and what the result should look like
Step 2: Establish Level and Start the First Course #
Additionally, snap a level line for the bottom of the first row. On a 3-sided shiplap fireplace, this line must wrap around ALL THREE SIDES at the same level. Use a laser level or a long straight level to transfer the line around the corners accurately. Even a small deviation at the first course will compound as you work your way up.
Furthermore, start with the first board on the front face, then continue the same row onto each side return. Every course must be installed across all three sides before moving up to the next course. This ensures the boards remain aligned at the corners throughout the entire installation.
📷 Photo Needed
Establish Level and Start the First Course — showing the key action and what the result should look like
Step 3: Handle the Outside Corners #
Moreover, for mitered corners, set your miter saw to 45° and cut matching miters on the front face board and the side return board. The two mitered edges meet at the outside corner to create a seamless 90° wrap. Always dry fit before nailing — check that the miter joint is tight, the boards are level, and the reveal spacing is consistent with the rest of the row. Apply wood glue to the miter joint before final assembly for a stronger bond.
Pin the miter joint with 18-gauge brads shot through both sides of the corner to lock the joint together. This prevents the miter from opening as the wood expands and contracts with seasonal humidity changes. Wipe away any glue squeeze-out immediately with a damp cloth.
Pro Tip: Mitered shiplap corners are unforgiving — even 1/2 degree off shows as a gap. Cut test pieces from scrap first to dial in your saw angle. Most walls aren’t perfectly 90°, so your miter may need to be 44.5° or 45.5° rather than a perfect 45°.
📷 Photo Needed
Handle the Outside Corners — showing the key action and what the result should look like
Step 4: Work Up the Wall Course by Course #
Install each row across all three sides before moving to the next row. This is the most important discipline on a 3-sided fireplace — if you get ahead on one face, the boards will drift out of alignment at the corners. Use spacers (nickel coins work perfectly) between each course for consistent reveals. Place a spacer at each end and one or two in the middle of each board.
Nail through the tongue or high on the board where the next board will cover the nail hole. For shiplap with a rabbeted joint, nail through the top of the rabbet. Use two brads per stud crossing — one high and one low — to prevent the board from cupping. Check for level every 3-4 courses and make small adjustments with the reveal spacing if needed.
📷 Photo Needed
Work Up the Wall Course by Course — showing the key action and what the result should look like
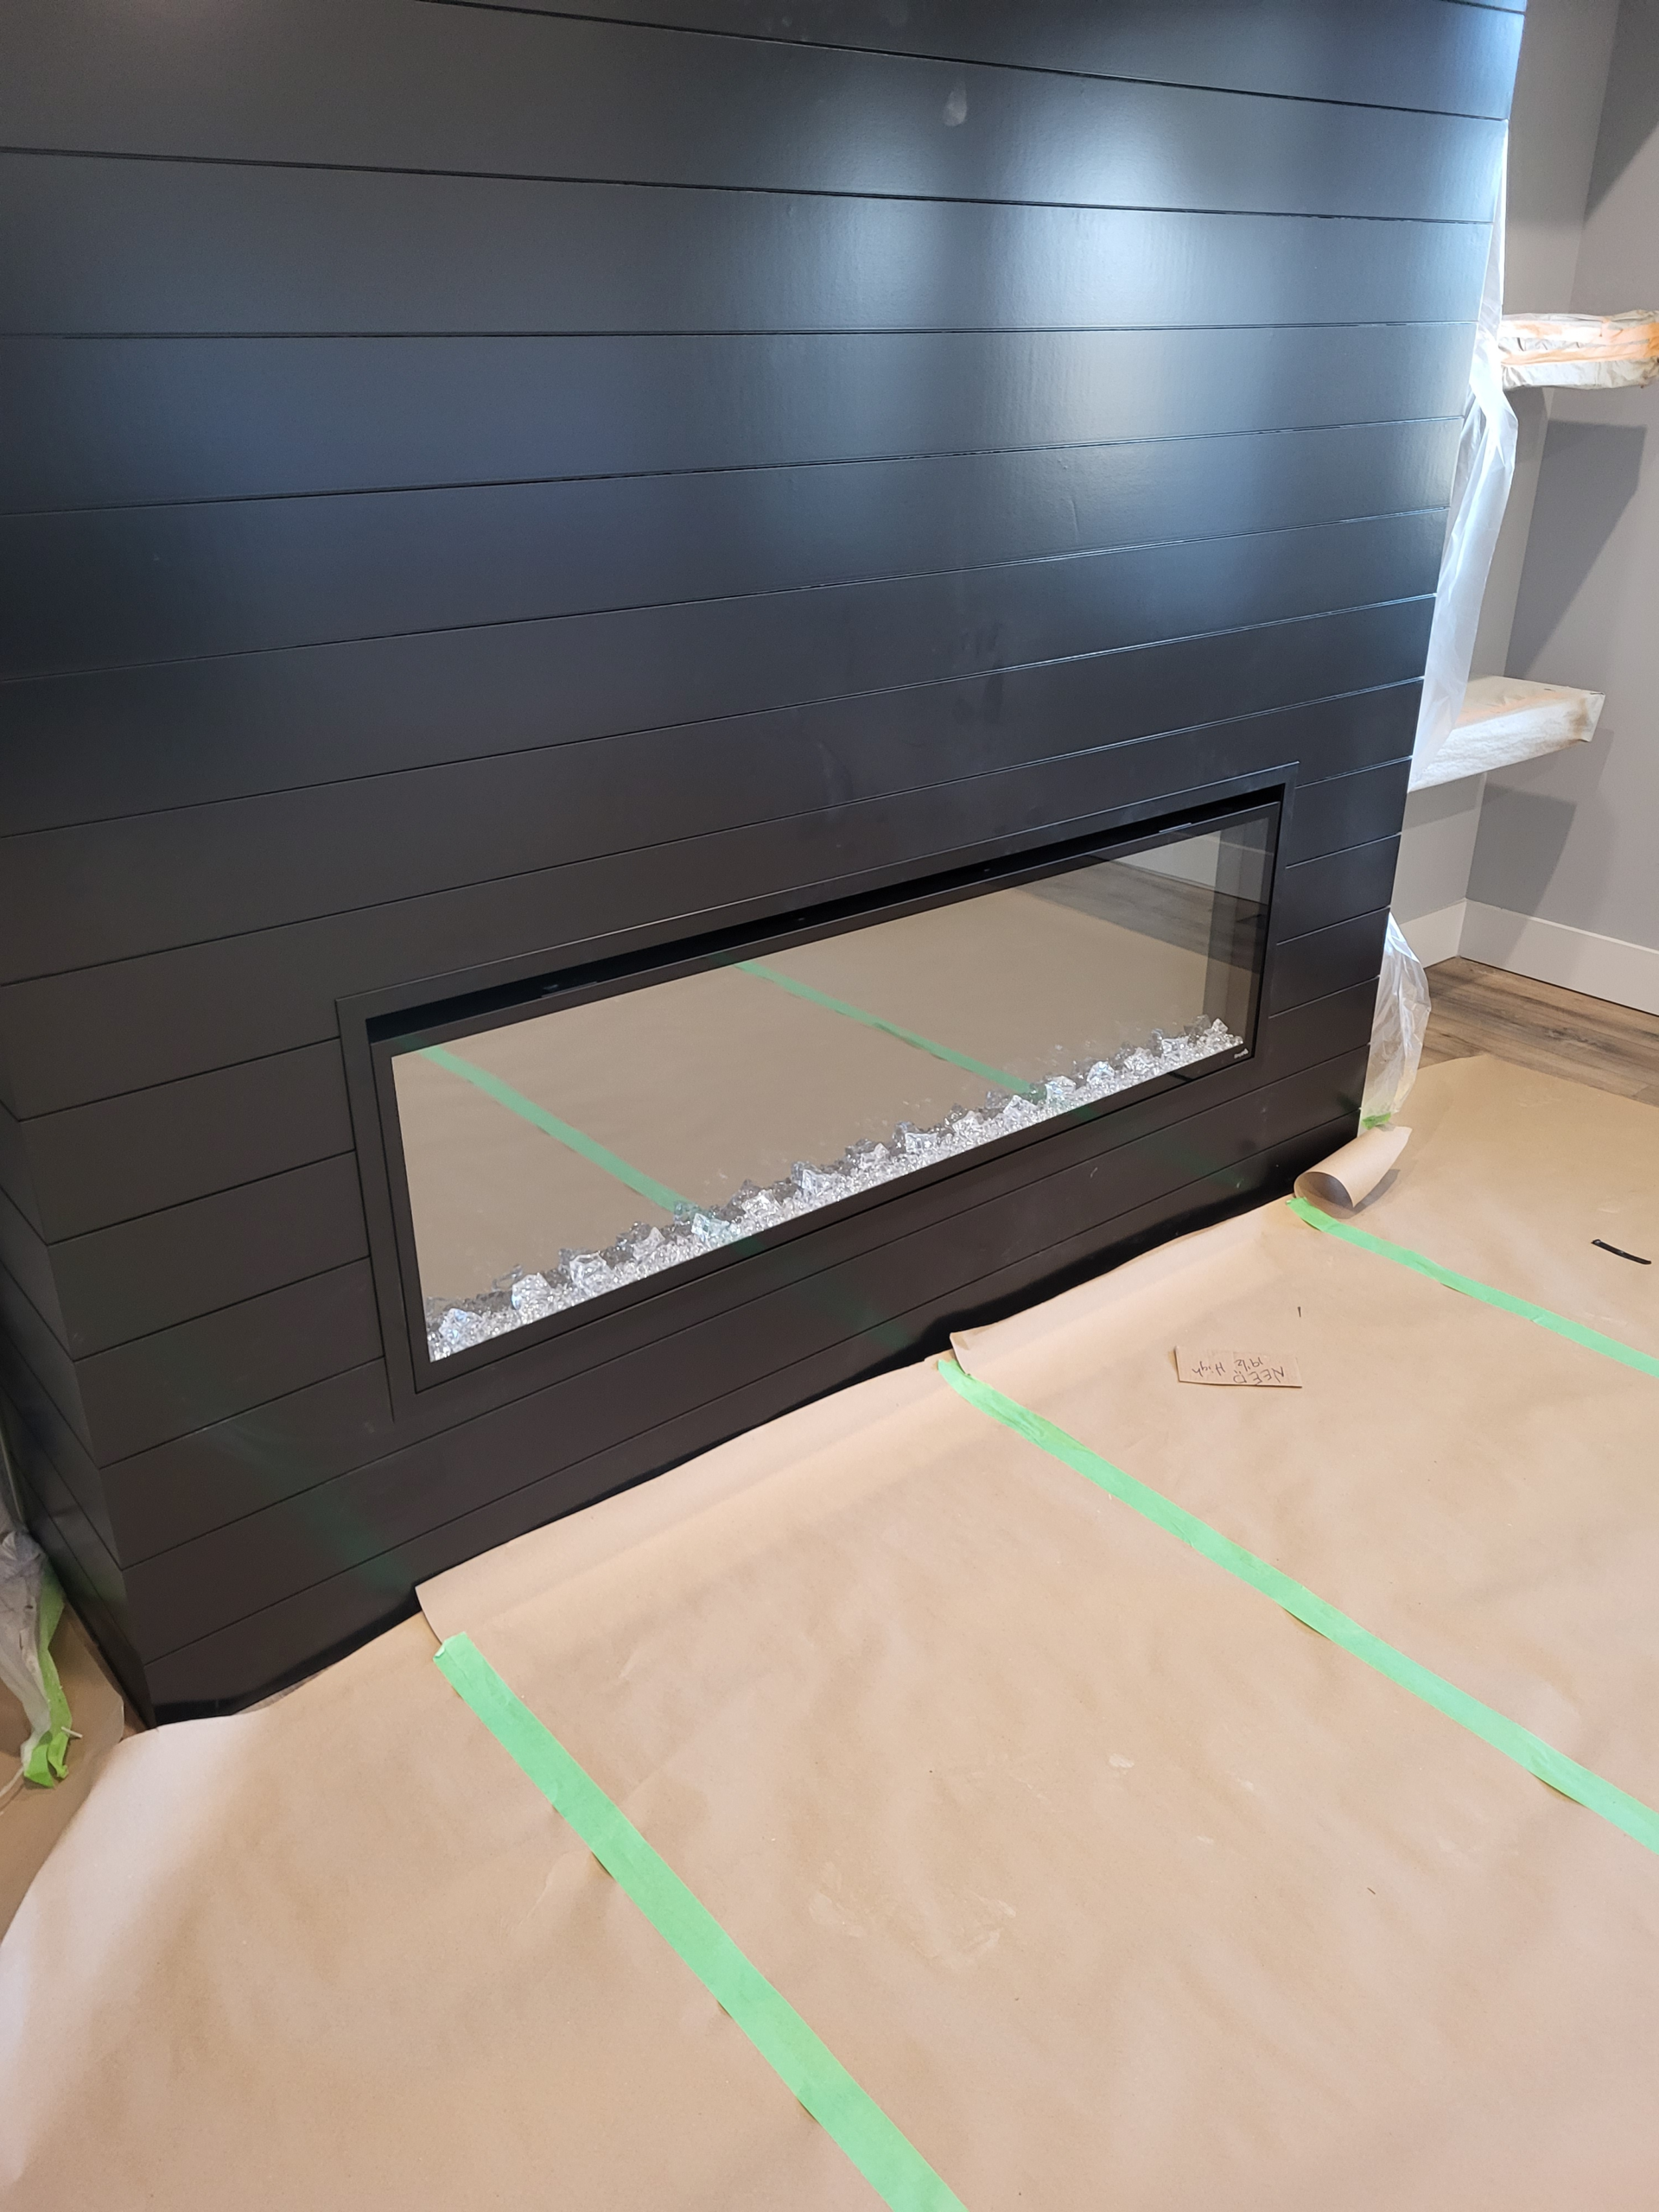
Step 5: Work Around the Firebox Opening #
When building your shiplap fireplace, measure carefully around the firebox opening. Transfer measurements to the shiplap boards and mark your cutlines clearly. Use a jigsaw or circular saw for straight cuts and an oscillating multi-tool for detail cuts and inside corners. Maintain the required clearance to combustibles per the fireplace manufacturer’s specifications — this is typically 6″ to 12″ from the firebox opening, but varies by manufacturer and model.
The boards that frame the firebox opening are the most visible boards on the entire installation. Take extra care with these cuts — they need to be straight, clean, and consistent on both sides of the opening.
Pro Tip: Board ends at the firebox opening need to be perfectly straight since they won’t be covered by trim. Use a table saw for these cuts rather than a circular saw freehand.
📷 Photo Needed
Work Around the Firebox Opening — showing the key action and what the result should look like
Step 6: Install the Top Row #
The top row may require ripping to fit if your layout math didn’t land on a full board. Rip the board on a table saw for a clean, straight edge — never use a circular saw freehand for a visible rip cut. On a 3-sided fireplace, the top row must align across all three sides. This is where careful layout planning at the beginning pays off.
If you planned correctly in Step 1, your top row should be a half-board or wider. Nail securely along the top edge since there’s no board above to hide the fasteners — you’ll fill these holes in the final step.
📷 Photo Needed
Install the Top Row — showing the key action and what the result should look like
Step 7: Final Details #
Fill any visible nail holes with wood filler matched to your paint or stain color. Allow the filler to dry completely, then sand flush with 120-grit sandpaper. Caulk the top and bottom edges where the shiplap meets the ceiling, crown molding, or baseboard. Use painter’s caulk for a paintable surface, applied with a steady hand and tooled with a wet finger for a clean line.
Touch up paint or stain at mitered corners, nail holes, and any areas that were scuffed during installation. Install the mantel if applicable — ensure it is level and properly supported with blocking behind the shiplap. Stand back and inspect the completed shiplap fireplace from multiple angles and distances.
📷 Photo Needed
Final Details — showing the key action and what the result should look like
Quality Check #
After completing this installation, run through this checklist to verify professional-quality workmanship.
- All boards level across all three sides
- Reveals consistent throughout (nickel spacing)
- Outside corner miters tight with no gaps
- Board courses align across front and sides
- Firebox clearance requirements met
- No visible nail holes (filled and touched up)
- Top and bottom rows are equal or symmetrical
- Finish is consistent (no missed spots)
- Mantel level and properly supported (if applicable)
📷 Photo Needed
Completed install shiplap on a 3-sided fireplace — close-up detail shots showing quality criteria being met
Troubleshooting Shiplap Fireplace Issues #
Miter joints have gaps #
The saw angle is not perfectly matched to the actual wall angle. Walls are rarely exactly 90°, so your miter may need fine-tuning. Re-cut the miter at a slightly adjusted angle — try 44.5° or 45.5° and test with scrap pieces. For small gaps that are already installed, fill with color-matched wood filler and touch up with paint or stain.
Boards don’t lay flat #
The substrate behind the shiplap is not flat. Use a long straightedge to identify high and low spots. Add shims behind boards at low spots to bring them flush, or flatten the substrate with a sander or plane before continuing installation. Construction adhesive can help hold boards tight to an uneven surface, but shimming is the better long-term solution.
Reveals getting inconsistent halfway up #
Boards may vary slightly in width from piece to piece, causing the reveals to drift over multiple courses. Re-establish a level reference line every 5-6 rows and adjust your spacing to get back on track. Small adjustments spread across several rows are invisible — one large correction on a single row is obvious.
Corner miters opening up over time #
Wood expands and contracts with seasonal humidity changes, and outside corner miters are particularly susceptible to this movement. Prevent this by applying wood glue to the miter joint AND pinning with brads shot through both faces of the corner. If miters have already opened, fill with flexible caulk rather than rigid wood filler to accommodate future movement.
Shiplap too close to firebox #
This is a code violation and a fire hazard. Remove any boards that are inside the manufacturer’s required clearance zone for combustible materials. Replace with non-combustible material (tile, stone, or cement board) within the clearance zone. Never compromise on fire safety — check the manufacturer’s installation manual for exact clearance dimensions.
Boards are cupping or warping #
The material was not properly acclimated before installation. Shiplap boards should be stored in the room where they will be installed for at least 48 hours before cutting and nailing. This allows the wood to reach equilibrium with the room’s temperature and humidity. If boards are already installed and cupping, remove them, allow them to flatten (weight them down on a flat surface), and reinstall once acclimated.
Helpful Resources #
These external resources provide additional detail on shiplap fireplace installation and fire safety:
- This Old House – How to Install Shiplap — Professional tips for shiplap installation with detailed corner techniques.
- Family Handyman – Shiplap Installation Guide — Step-by-step guide with close-up photos of nailing patterns and layout planning.
- NFPA 211 – Chimneys and Fireplaces Standard — National fire safety codes for clearance to combustibles around fireplaces.
📷 Photo Needed
Helpful Resources — photo illustrating this section
Related Guides #
These guides cover related shiplap fireplace and trim installation techniques.
- Fireplace Size Supplements:
- Shiplap Fireplace Wrap 10′-15′ — Mantel integration, extended miters, and two-zone planning
- Shiplap Fireplace Wrap Above 15′ — Grand-scale surrounds with multi-zone planning and full scaffolding
- Wall Installation Guides:
- How to Install Shiplap, 0′ to 7′ — Core wall installation for all four orientations
- How to Install Shiplap 2, 7′ to 14′ — Joint management for longer walls
- How to Install Shiplap 3, 14’+ — Wide wall techniques for great rooms
- How to Install Shiplap 4, Ceiling — Overhead installation
- General:
- Finish Trim Carpentry Guidelines
- How to Trim a House


